
 Nothing says Merry Christmas like glitter balls right?!? Last year, I made glitter ball ornaments for each of my stamp camp gals using their favorite Stampin' Up! colors. This year I had a handful of requests for wanting to know how to make the glitter balls themselves. So, for the December Stamp Camp, one of our projects will be glitter ball ornaments.
I'll have a couple of different colors of reinkers for my gals to choose from (or they can bring their favorite color reinker from home) and we'll be using gold and silver glitter. The glitter ball in the picture was made using 15 drops of Glorious Green reinker and gold craft glitter. If you switch to silver craft glitter, the same Glorious Green will come out looking totally different. These ornaments are especially pretty when the lights of the Christmas tree are shining behind them!!!
Monday, December 3, 2007
Deck the Halls with Glitter Balls!
Sunday, December 2, 2007
December Stamp Camp
 The December Stamp Camps start this week, so I figured it was time to show you a couple of the projects we'll be doing! Here is a paper bow created from one piece of 6"x12" double sided patterned paper. I have a ton of patterned paper scraps, so each person will get to choose what their paper bow will look like. This project is super easy and its a great way to coordinate your gift packaging with tags and cards!
Check out www.splitcoaststampers.com for the directions on creating paper bows.
Saturday, December 1, 2007
A Chocolate Chip Christmas
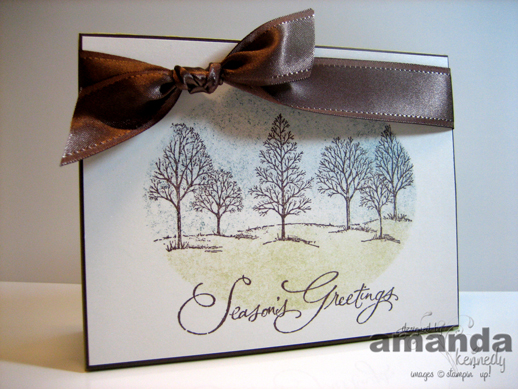 The pressure is on...with only a handful of my Christmas cards actually complete, I need to finish atleast 10 a day to get them out by the middle of the month! I buckled down today and finished 10 of this design. Whew! 10 down, 110 more to go!
Last month, I ordered some of the Shimmery White cardstock and Shimmer White envelopes and let me just say they are super-shimmery in person. Unfortunately, the camera doesn't do the shimmer justice! I used my Coluzzle to cut an oval out of copy paper and used it to reverse mask the image on to the Shimmery White cardstock. I stamped the tree-scape from Lovely As A Tree in Chocolate Chip and then sponged River Rock and Blue Bayou for the background. The sentiment is stamped in Chocolate Chip and I used some of the GORGEOUS Chocolate Chip Satin Ribbon (which is on sale right now!!) to dress it up a bit. This one got a thumbs up from the hubby - he really liked the color combo!
Wednesday, November 28, 2007
A Very Special Thank You
 Yesterday all of the ladies at work gathered together at lunch for a session on women's health. This is something that we do about once a quarter - we've had speakers from a local hospital come in and talk to us about topics such as breast cancer, fitness & diet, depression, and menopause. This past session focused on ovarian cancer and was so very informative!
We've had the same nurse come to talk to us these last few times...and let me just say, she is fabulous! She's so full of energy and is so passionate about women's health issues. She can even make a colonoscopy seem not-so-scary! I thought that I'd make her a little set of notes with my Causeabella stamp. Similar to the pink ribbons for breast cancer, aqua ribbons show support for ovarian cancer research. I used my Soft Sky Designer Series Paper for the background and kept the layout pretty simple. I'm going to package these notes in a clear box with a cute little belly band and send them to her with a coordinating thank you note signed by all the ladies in the office.
While I have your attention, I'm going to pass along a few bits of important information:
1) Ovarian cancer not detectable by a pap smear alone - you need a blood test and an ultrasound to detect any abnormalities on your ovaries.
2) While familiy history of ovarian cancer can put you at a higher risk for developing it, an absence of ovarian cancer in your family doesn't make you immune!
3) Know your body. Warning signs and symptoms of ovarian cancer can be easily attributed to other causes. If something doesn't feel right, talk to your doctor. If you are not comfortable talking to your doctor or if he/she dismisses your concerns - FIND ANOTHER DOCTOR!
Tuesday, November 27, 2007
Long time...no post!
During my little "vacation" I took a break from everything...including blogging! I spent time with family, I spent time in my craft room, I spent time Christmas shopping...it was great. Unfortunately, it was back to the real world yesterday, so I figured I should get back to blogging as well. I mentioned before that this year, instead of mass creating one card, I'm going to do a variety of different cards. While I was off work, I got a great start on different parts of my Christmas cards, but I didn't have a single card completely finished...until tonight. This is my first card that is completely finished.
The color combination that I used for this one is a little unconventional when it comes to Christmas cards, but I love Soft Sky, Regal Rose, and Wild Wasabi together! You may not be able to see it all that well, but there is irridescent ice embossed on the ornament. I think I might have gotten a little carried away with the different layers...I hope I don't have to pay extra postage!
Tuesday, November 20, 2007
What a FABULOUS day?!?
 Let me just start off by saying that today was a FABULOUS day! I had a spa appointment this morning...so I have been scrubbed, exfoliated, moisturized, masked, waxed, polished and pampered. And to make it even better, I had a gift certificate so it didn't put a dent in my wallet!!! When I get out of the spa, my hubby called to say he was heading down to the hunting camp and he'd be back tomorrow night. You know what that means...I don't have to cook dinner! See what I mean about a fabulous day?!? Don't get me wrong, I love my hubby dearly and I'll miss him while he's gone...but he needs some time to enjoy his hobbies too!
Once I got home from the spa, I shut myself in my craft room to finally start my Christmas cards. This year, there were so many Christmas stamp sets that I wanted to use - I couldn't narrow it down to just one design! So I decided that since I have about 110 cards to send out, that I'll create 10 each of 11 different designs. That way I get to use all of my favorite images AND I don't get bored coloring/embossing/punching the same things over and over! (I may totally regret this later, but so far its pretty fun!)
Here are a couple of images from Big On Christmas that I'll be using on different layouts. I borrowed this set from my generous downline and friend, Trish. And since its on loan, I better get to stampin'!
Monday, November 19, 2007
Vacation time
 I had some vacation days left and with the end of the year quickly approaching, I just HAD to take them (the company I work for has a "use it or lose it" policy when it comes to vacation days). So...I'm off work this whole week! I've caught up on all of my chores, so that means I get to spend some uninterrupted time in the craft room. Considering that I haven't even started my Christmas cards, I think I'll be stamping my little heart out!!
Here is one of the projects from the Stampers 7 workshop that was this past Saturday. This scrapbook page features a faux metal tag embossed with the scribbly-Christmas tree from Solemn Stillness. I'm getting better about making scrapbook pages, but I'm still bad about taking pictures. When I sat down and put this page together, I envisioned a cute picture of my hubby and I picking out our Christmas tree and another of the tree once its fully decorated. I'll make an extra effort to carry my camera with me when we go tree shopping and hopefully the finished page will look as cute as it does in my head right now!
Thursday, November 15, 2007
Another Stampers 7 Project
 Here is a 8 1/2" x 11" scrapbook page we'll be doing this weekend at the Stampers 7 workshop. I mentioned before that the theme is Advanced Embossing and on this project I used the Embossing Resist technique. At the bottom of the page, I embossed the Bold Snowflakes with clear embossing powder and then I sponged over them with my white craft pad. This left a real soft look that reminded me of snow!
The title is stamped in my fave alphabet set - Jumbo Outline Alphabet. The first two words are stamped in Bashful Blue and then colored in with a VersaMarker. "snow" is stamped in Bashful Blue, Pretty In Pink, and Wild Wasabi. I punched out photo corners (which I'm now TOTALLY addicted to!) but I'm waiting until I mount my photo before I glue them down.
Keep checking back for more projects from this weekend - there are still a couple that you haven't seen yet!
Wednesday, November 14, 2007
Thankful Garland
 When I saw the ultra-cute Thankful garland in the Holiday Mini Catalog, I decided I need to make one myself! Well...I'm finally done! (Just in time to drop it in the mail to my grandparents in West Virginia!)
The garland was a little tougher than I originally thought. Especially since I am hobby-blade-challenged. And I didn't quite embellish it as much as the sample, but I still love the way it turned out and am quite proud of the finished product! I think I might even use the remaining letters for a JOY garland. (I can certainly tough it out for a 3-letter word!)
Tuesday, November 13, 2007
Stampers 7 - Cracked Glass
 The Stampers 7 group meets this month and the theme for the workshop is Advanced Embossing. Most of my gals are familiar with embossing, but I'm going to be showing them how to step it up a bit. One of the techniques that we'll be learning is the Cracked Glass technique. I love the way that this technique gives your image a real vintage/antiqued look.
This card was inspired by one that I saw on Corie's blog. Hers was much more detailed and had some great embellishments. But for this workshop I wanted everyone to really concentrate on learning how to do the technique, so I scaled it back a bit!
The main image is inked with Bravo Burgundy and Always Artichoke Stampin' Write Markers and then embossed numerous times with Glassy Glaze. The background stamp is Print Pattern (one of my all-time faves and my vote for the most versatile!) and its stamped in Always Artichoke Classic ink on a piece of Always Artichoke cardstock. The greeting is stamped with Always Artichoke as well. To dress the greeting up a bit, I punched the corners with the ticket corner punch!
Thanks Corie for the great inspiration!
Monday, November 12, 2007
Thanksgiving Card
 Sorry for the lack of posts this weekend - my wireless internet connection was down! So I had to wait until I got to work to upload this card.
This is my Thanksgiving card this year - I love the sketchy-line art of these pumpkins! Plus I figured it was a good time to practice my watercoloring. The layout is a little simplistic - I'm just itching to go back and add something else to it. Maybe the leaf images watercolored and cut out...or some ribbon somewhere. I'm not sure what its missing, but I feel like its missing something. But I better hurry and make up my mind so I can get these in the mail before next week!
Wednesday, November 7, 2007
Thank U
 Have you ever been trudging through your day, completing everyday tasks when you get a great idea for a card or scrapbook page? You can't drop what you're doing, scurry off to your crafting area and create your masterpiece - so you tell yourself that as soon as you get a spare minute, you'll start stamping. Then, when you get a chance to actually sit down and commit your idea to paper, the inspiration is gone! Vanished! That happened to me today - I had a ton of ideas throughout the day. Projects that I thought would be cute, color combos that I wanted to use, and layouts that really stood out. But when I made my way to my craft room, I just stared at the cardstock like it was going to stamp itself!!! Ugh!
Believe it or not, this card started off as a tent-topper card...but it just wasn't working for me. I loved this patterned paper and wanted to use it as the background, but I couldn't get the main image right. Finally I settled on this "Thank U" sentiment from True Friend. I think this stamp really coordinates with the rustic, western feel of the patterned paper.
The sentiment is stamped on to a piece of Very Vanilla cardstock and then the edges were distressed with the Cutter Kit. The scalloped square was punched with the Marvy Giga Scalloped Square punch (hopefully Stampin' Up! with have a scalloped square soon).
Whenever I pull out this paper to use on a project, I feel the need to use these jumbo eyelets with it. I just love the look that the combination gives to the project! And, of course, I had to throw in some of the 5/8" grosgrain ribbon.
I'm not giving up on the tent-topper just yet - there are still a couple of ideas I have floating around in my head (and hopefully tomorrow, I won't draw a creative blank when it comes to actually doing them)!
Drum Roll Please....
The winners are Jill, Nancy, and Dishaloo! If you guys will send me your addresses (aksimplesentiments@yahoo.com), I'll get your goodies out to you! Remember, its your turn to Pay It Forward! If you don't have a blog or website, then do something sweet for three special people in your life.
Thank you all so much for your sweet comments! This was so much fun, I might have to offer blog candy more often!
Tuesday, November 6, 2007
Blog Candy Pics


I promised sneak peeks at the Blog Candy that I'm offering up tomorrow - so here you go! The first is two packs of double-sided patterned paper (from the 2006 Holiday Mini), the second is a new spool of Whisper White grosgrain ribbon and white eyelets, and the third is the Christmas Simply Scrappin' Kit from last years catalog! I figured with the holidays around the corner, you guys might like some papers/embellishments that you can incorporate into your holiday projects. Each winner will also get a little something extra thats personalized. (Once the winners are drawn and the goodies are personalized, I'll post pics of them too!)
So if you are interested in snatching up any one of these holiday-themed items, then scroll down to the original Blog Candy post and leave a comment. I'll draw three names Wednesday night. And don't let not having a blog keep you from entering - even if you don't have a blog or a website, you can still Pay It Forward by passing along goodies to three lucky people in your life!
Monday, November 5, 2007
Oh So Lovely!
 I love this poppy image from the Oh So Lovely hostess stamp set. Its so versatile, you can use it for a wide variety of occasions! For this project, I paired the Define Your Life stamp set with the Headline Alphabet for the greeting and used the poppy as my main image.
The flower is stamped with StazOn and then watercolored with the Purely Pomegranate and Old Olive Classic Stampin' Pads and an Aqua Painter. I tied a piece of yummy satin Purely Pomegranate ribbon around the matted image (this ribbon is just plain GORGEOUS in person). The black brads in the upper right corner help to balance out the wide ribbon.
My stamp campers have the option of using any of the definitions from the Define Your Life stamp set. Once they decide on a word, they'll stamp the corresponding letter in River Rock on to the River Rock card base. Then the definition is stamped over the letter with the Old Olive Classic Stampin' Pad. I just love the way the letter looks behind the definition!
Sunday, November 4, 2007
JOY
 When I received my swap cards in the mail from Corie, there was one color combo that really caught my eye. It was a Christmas card that featured Soft Sky, Pretty In Pink, and Basic Black. I loved the way the soft colors looked together on a Christmas card, so I decided to use it for my All About Alphas stamp camp. Only I substituted Wild Wasabi for the Basic Black - it was hard enough stamping green snowflakes, I don't think I could have brought myself to stamping black ones!!!
"J" and "Y" is from the Big Deal alphabet set and is stamped in Soft Sky. The "O" is actually a snowflake image from the Snow Burst stamp set. Its stamped with a Pretty In Pink Craft Pad and is embossed with Irridescent Ice embossing powder. I punched out the snowflake image with the 1 3/8" Circle punch, layered it on a piece of scalloped Soft Sky, and popped it up with a dimensional. The double-stitched grosgrain was a last minute add - there was just too much empty space on the ends.
Other words that would work for this card - Snow, Noel, Love, Home...can you think of any others?
Saturday, November 3, 2007
Blog Candy - Pay It Forward!
When I got home from my trip to West Virginia for my grandfather's funeral, I checked a couple of my favorite blogs to see what I had missed while I was gone. Turns out that I won some BLOG CANDY! Yay!!! Flossie from Flossie's Follies posted some Blog Candy (Pay It Forward-style) and I was one of the winners! Thanks Flossie - you made my day!
Now its my turn to Pay It Forward. Here's the deal: leave a comment on this post and on Wednesday (11/7) I'll randomly pick three winners. If I pick your name, you'll send me your address and then I'll send you some goodies (which I'll post pics of tomorrow). Then those three Pay It Forward by posting blog candy on their websites/blogs!
Check back tomorrow - I finally made my way back into my craft room and I have some goodies to share!
Sunday, October 28, 2007
Sad News
My grandfather passed away on Friday, so I will be traveling to West Virginia for the service and to be with my family. Needless to say, there will not be any new posts for the next couple of days.
Thursday, October 25, 2007
All About Alphas
 The November Stamp Camps are just around the corner, so here is a little sneak peek as to what we'll be doing! The theme for November is "All About Alphas" - we'll be incorporating different alphabet sets into each one of our projects! Trust me - alphabet stamp sets are good for more than just titles on scrapbook pages!
This project uses one of my absolute FAVORITE alphabet sets, the Jumbo Outline Alphabet. (I've uploaded a project or two with this set before) These letters look great when they aren't perfectly aligned and they overlap a little bit. The Chocolate Chip cardstock is stamped with the new Dotted background stamp and the Old Olive cardstock is distressed with the Cutter Kit. For the stamp camps, I think we'll use the gorgeous Chocolate Chip satin ribbon from the Holiday Mini. (Its on its way to my house as I type!)
Keep checking back for more pics of this month's stamp camp projects! I'll also be posting sneak peeks of the Stampers 7 projects, too!
Edited to Add: I forgot to mention that I CASE'd this card from someone on Splitcoast - so I can't take credit for the cute design!!
Wednesday, October 24, 2007
Warm Wishes Sympathy Card
 I got a phone call today that my great-uncle had passed away and I really wanted to create a card for my great-aunt that expressed my sympathy without saying "With Sympathy". I thought that this "Warm Wishes" sentiment would work nicely. I'm not sure what exactly inspired the color combination of Close to Cocoa and Ruby Red...(maybe it was the fact that my great-aunt's name is Ruby???)...but it works.
This wasn't exactly how I pictured this card turning out...but I do like the finish product. I tried to do a card that wasn't so even and symmetrical, but I think the OCD side of me kicked in! I just wasn't feelin' it! So, I centered the main image and then added a strip of Whisper White to balance it out a bit.
Here lately it seems like I'm running a little low on my stampin' mojo...I'm hoping it comes back soon!
Monday, October 22, 2007
Eat Cake!
 I love the Eat Cake stamp set! The present, the cake, the candles...all so very cute! This is a card that I made a while back and then just tucked away in my card box. I used a gender-neutral color combo so that I could grab it and go when I needed a last minute birthday card. When a co-worker (who just so happens to love birthday cake as much as I do) celebrated her birthday last week, I decided this would be perfect!
The card base is Whisper White. The 4 pierced squares are Chocolate Chip, Certainly Celery, Bordering Blue, and So Saffron. The streamers for the present were stamped first and then the present was stamped, cut out, and popped up with a dimensional. Then I stamped the candles along the bottom of the card. And don't forget the perfect birthday greeting...Eat Cake!!
Friday, October 19, 2007
Out of Town
Just wanted to give you guys a heads up that I'll be out of town this weekend, so that means do posts for a couple of days! Check back the beginning of next week for some fresh new projects!
Wednesday, October 17, 2007
Glenda's Halloween Card
 Along with all of my goodies from her downline swap, Glenda also sent this fabulous card in the package! I love it!! It has patterned paper and ribbon, how could I not love it?!?
Its a square card (fits in the 5 1/2" x 5 1/2" envelopes). The short flap on the left leaves just enough room for writing a short note on the inside of the card! Cute, huh?
I think I'm going to CASE this layout for my Christmas cards...Thanks Glenda for making the "design" process a bit easier!!! :) Now all I have to do is decide which stamp set and patterned paper to use!
Tuesday, October 16, 2007
Happy Mail!
 Guess what Mr. Postman brought me today??? Bills - nope. Junk mail - wrong again! He brought my swap cards! A couple of weeks ago I posted the swap card that I was sending to my demo-friend Glenda. And this is what I got in return! Pretty fabulous, huh?!?
The back left is a tent-topper card with the jumbo Snow wheel shadow stamped on the front. (You know where you wheel the image in white ink first and then you wheel over it with a darker color? Yeah - I can never get mine to match up but this card turned out BEAUTIFUL!) The back middle is a card that pairs reverse masking with the Stem Silhouettes stamp set. The color combo is awesome!! The back right is like a stained glass window in real life. The tag from Holy Triptych is stamped and then the inside is cut out. The Mary and Joseph image is stamped on another piece of cardstock and then layered under the cut out window. (That probably makes no sense, but I'm trying to do this card justice!)
The middle left uses a trio Season of Joy Christmas trees. They are masked to give the main image a bit of dimension. The colors on this one are fabulous! The middle card on the middle row uses some of the delicious wrapping paper as the background! How cute is that?!? And with the amount of wrapping paper that comes on a roll, it would last forever!! The middle left card also uses the Season of Joy Christmas tree, but this one pairs it with the Dashing designer series paper for a totally different look. Real Red brads were also added for a little bit of WOW on the front of the card!
The front left card uses one of my all-time favorite holiday themes - SNOWFLAKES!!! And the way that the creator used a snowflake for the "O" in JOY...just precious! The front right card has some awesome circle tags from the Naughty or Nice stamp set. Each one is double-matted and "hung" with a bow!
I love each and every one of these cards! These gals are SUPER-talented and I love to participate in their swaps!!
Monday, October 15, 2007
Punkin' Seeds
 I saw these super-cute seed cards on SCS and the original poster (I can't remember her name!!) attached the .pdf file for others to use. I chose to CASE the Jack-O-Lantern seed packet card - I thought it would be perfect for my Halloween cards this year!
The card base is River Rock. I matted a piece of Apple Cider designer series paper (which is just as yummy as it sounds!) on to a piece of Close to Cocoa and attached it to the card front with dimensionals. I printed the faux seed packet on to a sheet of Whisper White cardstock. I stamped the short, fat pumpkin from Carved and Candlelit with Really Rust, the stem is in Wild Wasabi and the face is Basic Black. The seed packet is mounted on to the card front with dimensionals and the card is topped off with a bit of Wild Wasabi double stitched grosgrain ribbon!
Isn't this a super-cute idea?!? If you are interested in the seed packet cards, drop me a comment and I'll send you the .pdf files! In the mean time, I'm going to back track and see if I can find out who the original artist was so I can give her the proper credit!
Saturday, October 13, 2007
WANTED
 My hubby and his family love horses and have a barn full of them on their farm. So, when I first saw this stamp set in the Fall-Winter Collection, I knew that I had to add it to my arsenal! This stamp set, Wanted, closely coordinates with the Style Watch Collection Boho West. So, of course, I had to also order the Outlaw Designer Series Paper and Jumbo Eyelets!!
I normally don't use whole lot of Sage Shadow, but I really like the way it looks when you pair it with Chocolate Chip and Close to Cocoa. So, for the base of the card (which measures 5 1/4" x 5 1/4") I pulled out a sheet of Sage Shadow. The card base is stamped with the large circle design and then I sponged the edges for a distressed look.
I used a sheet of patterned paper from Outlaw for the background behind the image. Its matted on a piece of sponged and distressed Chocolate Chip. I used my Chocolate Chip Craft Pad to stamp "WANTED" at the bottom of the patterned paper.
The main image is a piece of distressed Very Vanilla cardstock lightly stamped with the large circle design in Close to Cocoa and the paisley image in Sage Shadow (I stamped off twice before I stamped the images on the Very Vanilla). The horse image is stamped first with the Chocolate Chip Craft Pad and then repeatedly stamped - without reinking.
The card looked a little plain as it was, so I added some twill tape that was sponged with Chocolate Chip ink and two Jumbo Eyelets. (Setting the Jumbo Eyelets is SUPER easy with the Crop-A-Dile!!) Perfect for my favorite cowboy!
Wednesday, October 10, 2007
Bundle of Joy
 One of my stamp campers just found out that she's having a baby boy, so I had to pull out the Bashful Blue and Certainly Celery! This stork is from the last catalog...or maybe even the one before that. Either way, I love this little guy!
The stork image is colored with Stampin' Write Markers and the little baby face has a dab of Crystal Effects. The congrats stamp from Circle of Friendship is stamped with Bashful Blue and then punched out with the 1 1/4" circle punch. Its matted in Bashful Blue cardstock and then popped up onto the scalloped circle.
Have you guys tried the 5/8" grosgrain ribbon yet? Its FABULOUS!
Tuesday, October 9, 2007
So Chic
 One more sneek peak at the October Stamp Camp projects...this one uses a SUPER-CUTE background stamp new to the Fall-Winter Collection. Its Tres Chic and I love, love, LOVE it! You can ink the entire stamp to use it as a background, or you can use Stampin' Write markers to only ink one or two words for your greeting.
The card base is Blush Blossom (a color that I just don't use enough...its really pretty, but it just not one of my "go-to colors). Tres Chic is stamped in Always Artichoke on to a piece of Whisper White and then covered with vellum. I think the vellum just gives it a bit of a softer look. The flowers are from Heartfelt Thanks. Then to finish it off...you guessed it! Ribbon! So much for my ribbonless-streak, huh?
Monday, October 8, 2007
Paisley & Perfect Presentation
 Here is another card from the October Stamp Camps. This one features the Paisley background stamp, which happens to be one of my favorites. You can pair it with really dainty florals for a soft, feminine card or project...or you can use it with more rustic colors for a masculine look! Here, we are going to be using for a Christmas card.
The Paisley background is stamped on to the Ballet Blue card front with Ballet Blue Classic ink. The Christmas tree is stamped in Wild Wasabi on Whisper White and then matted on Wild Wasabi. The Real Red strip of cardstock is layered over the card front and secured with Real Red brads. Finallly, JOY is stamped on to the strip of Real Red with the White Craft Pad.
Do you notice something a bit different about this card??? NO RIBBON! Can you believe it?!? I actually finished a card without a single stitch of ribbon, hemp, or fiber! Don't worry, it wasn't for a lack of trying - I was out of the Wild Wasabi double stitched ribbon!
Thursday, October 4, 2007
Holiday Mini Swap
 I've mentioned before that I often participate in swaps with my SU! Demo-friend, Glenda. She always includes me in on the downline swaps she hosts...even if I'm not officially in her downline. This one was for the Holiday Mini Catalog and I chose to use True Friend and the new Boho wheel.
The card base is Kraft cardstock and I used my Chocolate Chip and Whisper White Craft Pads to create the background. The Boho wheel was wheeled along a torn piece of Chocoalte Chip cardstock. The main image was inked with Really Rust, Chocolate Chip, and Old Olive Classic Stampin' Write Markers. I pierced the bottom of the Whisper White cardstock and then distressed the edge.
I can't wait to see the cards I get in return! This is quite possibly my favorite mini catalog yet and with only 2 months left, there are still quite a few items on my wish list.
Wednesday, October 3, 2007
Have I uploaded this one before???
 I was looking through by blog pics folder for a Christmas card that we'll be doing at the October Stamp Camps and I came across this chef card. I don't think I've posted it here...but then again, its kinda late and my mind gets a little loopy when I'm up past my bedtime! If you've seen this one before, the you can just ooohhh and aaahhh at it again!
This card is for a subcontractor that the company I work for does a lot of business with - for Labor Day, he sent the people in the office Boston Butts! Hence the pig on the platter! The butts really are great and my hubby and I look forward to them every year!
The base of the card was stamped with the Canvas background stamp in Bravo Burgundy Classic ink. Then Print Pattern was stamped in Bordering Blue on to a piece of Bordering Blue cardstock. The chef image from Voila was sent to me by one of my SCS friends - she had stamped it with Stazon, so I used an AquaPainter and ink pads to color him in. The little piggy is from Very Punny (SAB 2007) and is popped up with a dimensional.
Monday, October 1, 2007
October Stamp Camps - Background Basics
 The theme for the October Stamp Camp is Background Basics. Each of the projects will feature a background stamp from the Fall-Winter Collection. This is one of the projects that we'll be doing this month. You can't really see the background all that well, but I used Flannel Plaid stamped in Chocolate Chip Classic ink on the Chocolate Chip card base.
The main image is a pumpkin from the new Autumn Harvest set from the Holiday Mini. I love, love, LOVE this set!!! Its perfect for watercoloring! I stamped the tall pumpkin on Naturals Ivory cardstock using the Timber Brown Stazon Pad and then watercolored it using a combination of Watercolor Wonder Crayons and Classic Stampin' Pads in Pumpkin Pie, Garden Green, and Chocolate Chip. I love the way this card turned out - it reminds me of fall!!
Wednesday, September 26, 2007
More K&Company
 Well, I just checked with UPS and my new goodies are "Out For Delivery"! So hopefully I'll be able to play with them and create some new blog pics very soon!! Until then...more yummy projects with this gorgeous K&Company paper.
I used the photo mat pack for the background of this card. The main image is another bella from Stamping Bella. This one, Causeabella, can be used for so may different "ribbon" organizations and causes. I made this card for a brave, fellow stamper that is fighting a recent diagnosis of breast cancer. I just wanted her to know that there are many of us out here cheering her on!
Tuesday, September 25, 2007
I'm lovin' patterned paper!
 Here lately, it seems as if I can't create a card without using patterned paper!!! I'm lovin' the stuff!
While I am (not so) patiently awaiting the arrival of some new SU! goodies, I've pulled out some of my impulse buys from the local craft store. I found this GORGEOUS paper by K&Company. It comes in a little mat pack, which according to the front cover is perfect for matting 4x6 pictures. But I immediately thought that it would be perfect (with some minor trimming) for cardfront backgrounds. The colors are pretty similar to some of Stampin' Up!'s colors, which is another reason I just had to have it! Not to mention it was on sale. Can you tell I'm trying to ease my guilt from buying a non-SU! product???
Anyway, I paired this cute floral patterned paper with one of my favorite images from Farm Fresh. I love the greeting! This card was sent off to a very dear friend of mine who just so happens to be going through some of the same issues I am. I swear its divine intervention - God knew we both couldn't handle these things alone so we are both trudging through it together. His timing is perfect!
Monday, September 24, 2007
A New Post......finally!
 Between reconstructing my craft room, my monthly stamp camps, and LIFE, I haven't had a whole lot of time to update here. Well, things have calmed down a bit (for now, atleast) so I have some goodies to share with all of you!
This is a cute little pocket card that I did for a Holiday Swap hosted by Corie. I got the pattern for the card from Splitcoast -I think its the Criss-Cross Card? Anyway, I used Cerise patterned paper for each of the sides and the belly band. The seam of the band is covered up by the scalloped circle punch. (The Very Vanilla cardstock doesn't wrap around the card because I didn't have any 12" x 12")
The insert is Very Vanilla matted on to Real Red. You can't see it in this picture, but I stamped the swirly image from the Priceless set in the bottom right corner of the insert using my Old Olive Classic Stampin' Pad. I used the double slot punch/ribbon punch to punch two holes in the top of the matted insert and I threaded Old Olive 5/8" ribbon through for a faux knot.
All in all, I think this turned out SUPER cute. Not sure that I would use it for my Christmas cards - you'd probably need extra postage for this heavy baby!!!
Wednesday, September 12, 2007
Faux Stitching
 The September stamp camp is centered around different ways to use the White Gel Pen. This is one of the projects that we'll be doing. Although it doesn't show up well in this picture, this is a great color combination featuring three of the new 2008 In Color colors: Blue Bayou, Soft Sky, and Groovy Guava. The project showcases a technique called Faux Stitching. Faux Stitching is a way to get the look of a hand-sewn card without dragging out the sewing machine! Once you get the hang of it, its a super simple way to add a little extra WOW! to your projects.
The easiest way to pierce a straight line of holes is to use the paper piercing template. (The template comes in the Crafters Tool Kit, but it can also be purchased separately in the Mat Pack) Lay the template over the cardstock and line up the gridlines on the template with the edges of the cardstock. Use the paper piercing tool (or a needle or push pin) to pierce a line of holes in the cardstock. Next, use the White Gel Pen to connect the holes with a series of dashes. When you are finished, these dashes will look like the stitches of a sewing machine!
Tuesday, September 11, 2007
More pics soon...
I promise! The installation of my new countertop was a bit more than we anticipated...the countertop I had (we installed only a year ago) has been discontinued. And hubby is a real stickler about things matching, so that meant ALL NEW COUNTERTOPS. Yeah...I think he may have been regretting ever suggesting that I "needed" more workspace. Anyway, he went and picked up the other piece that we needed and we installed it this past Friday. I spent Saturday and Sunday trying to put everything back in order. I was able to make some cards last night though...I'll upload those today or tomorrow! Thanks for your patience!!!
Wednesday, September 5, 2007
New and Improved Craft Room
Well...we went to Lowe's on Monday and picked out a couple new base and wall cabinets. We spend the afternoon putting them together and installing them in the craft room. Talk about quality time with the hubby!!! Here's what the craft room looks like now:


Sunday, September 2, 2007
Happy Labor Day Weekend!
I hope everyone is having a great holiday weekend! Posts will probably be at a minimum for a couple of days...my hubby decided to add some more base and wall cabinets to my craft room. Isn't he just the greatest?? I didn't ask for it - he just thought I might like some more storage and countertop space. So things are a little topsy-turvey as I try to re-organize everything to take advantage of my new space. I'll post some pics of my revamped space once we're finished!
Friday, August 31, 2007
Golfabella
 If you visit SCS regularly, then chances are you've seen a bella or two. If not, then you need to check them out - they are adorable! (http://www.stampingbella.com/) There are dozens and dozens of bellas for all occasions and occupations. There are even a few fellas, too!
This is Golfabella - doesn't she look so cute in her argyle socks and golf visor?? I made this card for one of the gals in my office. She's an avid golfer and a bit of a girly-girl, so I thought this would be perfect!
I used a tried and true layout to show off some patterned paper. The happy birthday was stamped on to a piece of scrap Whisper White and then punched out with the Dog Tag punch. I trimmed one of the ends so that it would line up with the edge of the patterned paper.
I don't have any of the oval stamps for shadows and I didn't want it to look like my bella was just floating out there in space. So to mimic a shadow, I traced the inside opening of a small piece of HodgePodge Hardware and then I filled in with a Sahara Sand marker. Not to shabby, huh?
Thursday, August 30, 2007
Jumbo Hello
 OMG - I am so in love with this alphabet set!! The Jumbo Outline Alphabet is fabulous, absolutely FABULOUS! I've been playing around with different words and titles...thanks, hello, happy, merry, baby, love, wish. There are so many possibilities!
For this card, I broke into my stash of Brocade double-sided designer papers. I had planned on using the reverse side, but when I went to apply adhesive to the back, I realized that this particular pattern was a better "fit" for the overall look of the card. I love the look of the River Rock flourishes over the Chocolate and Olive brocade pattern in the background.
The letters were stamped on to watercolor paper using the Timber Brown StazOn pad. Then I used an AquaPainter and my Old Olive Classic Reinker to watercolor each of the letters.
You will definitely be seeing more examples with this alphabet set - I just love it!
Wednesday, August 29, 2007
September's Peaceful Wishes
 Its never to early to start your Christmas cards and for this reason, each month I will offer atleast one Christmas card at my next 4 stamp camps! This one is a project from my upcoming September Stamp Camps. (The $10 pre-paid fee includes an order for a White Gel Pen to be used on each of the projects.)
I CASE'd this card from one that I found on SCS. The original design featured the 2006 In Color, True Thyme. To update the project and make it a little more "Christmas-y" I switched up the colors and used Always Artichoke, Bravo Burgundy, Sahara Sand and Whisper White.
The main holly branch image was stamped in Always Artichoke Classic Ink on to the piece of Sahara Sand cardstock. I sponged White Craft Ink around the edges and then highlighted the berries with the White Gel Pen.
This card is super-easy and would really lend itself to mass production. And for an extra touch, stamp the holly image on to the front of the envelope to tie it all together!
Tuesday, August 28, 2007
Happy and Delightful
 I got some new goodies! Part of the order was for my September Stamp Camps (Using the White Gel Pen) but the rest of the order was for me! At first I couldn't decide which Level 1 Hostess Benefits set I wanted...until I saw these papers. I love, love, LOVE these colors together!The papers are a part of the Creative License Simply Scrappin' Kit. The kit also includes textured cardstock (yummy) and stickers perfect for cards and scrapbook pages. Too bad you can't purchase this kit directly - I would definitely stock up!
I cut down a piece of the 12x12 Blue Bayou textured cardstock to a standard sized card. I used Wild Wasabi cardstock to mat the two pieces of patterned paper and then used a piece of Wild Wasabi double-stitched ribbon to over the seam. The "delightful" stamp is from Its All Good and the "delight" definition is from the Define Your Life stamp set.
I made another very similar card using "happy" circle stamp as well as the "happy" definition. I'm sending these two cards out to my grandparents along with a picture of me and my hubby from our beach vacation this year. Its just a small way of letting them know that I love them!
Monday, August 27, 2007
Love of a Lifetime
 One of my best friends from high school got married this weekend and I need to thank my husband for being a real trooper. Over the past few months, we had event-after-event-after-event to attend. Then Friday was the rehearsal and rehearsal dinner. Saturday was the wedding and the reception. He was there by my side thoughout the whole thing. Don't get me wrong, there was a bit of complaining along the way, but he didn't let me down!!
Its been a while since I've made a card for my dear sweet hubby, so I figured this was a perfect opportunity! So Many Sayings has a number of different greetings that are laid out to be mounted on three separate blocks. I like this one block with all of the greetings used together - its like different ways of saying I Love You to that special someone.
I stamped the block of greetings with a Real Red Classic Stampin' Pad and then mounted the Whisper White cardstock on to a piece of Real Red cardstock. I cut out a couple of stamped Priceless hearts and mounted them to the right of the greetings. The card seemed a little incomplete without ribbon, so I added some stitched red grosgrain across the bottom. Hope he likes it!
Sunday, August 26, 2007
My birthday month is just around the corner...
 That's right...I said birthday MONTH! I'm a big proponent of celebrating throughout the entire month of my birthday (September). Now, I don't expect cake and ice cream every day of the month, but I do like to do some special things here and there over the 30 days. I'm not stingy with birthday months either - I think its a pretty good policy all around. (My hubby still hasn't totally bought into it yet - oh, well!)
Anyway, my first of many 29th birthdays is on September 7th. So I'm trying to get into the birthday mood, so I created a birthday themed scrapbook page. I used some scrap patterned paper that I had lying around for the border of the page. I used the Spiral Punch for the edge of the photo mat. I punched a tab with the Rounded Tab Punch and then stamped "happy birthday" with the Everyday Flexible Phrases stamp set. (I'm waiting to select a picture for the page before I glue down the top portion of the tab.)
I love the date stamp from Office Accoutrements so I stamped, matted, and mounted it to the bottom of the page. Add a little white grosgrain ribbon and the page is complete!
Friday, August 24, 2007
Another Chipboard Birth-day
 Remember my friend that was on bed rest??? Well, I mailed out her card on Monday. Later that afternoon, I got an e-mail that said she went to the hospital the night before and she was in labor! No wonder she was on my mind Sunday! Baby Max made his big debut later that evening. Welcome to the world Baby Max! Everyone is healthy, happy, and now resting at home.
Here is a card that I will be sending out today. The small greeting says "Twinkle, twinkle little star - darling baby, here you are!" I bought this set from this past Winter Mini for this one greeting stamp - I think its absolutely adorable! Especially when you pair it with a chipboard star.
The polka dotted patterned paper is from the Designer Series Double-Sided Patterned Paper in Certainly Celery. The striped paper was a scrap left over from last summer. (The Fall-Winter Collection offers a similar assortment featuring fall colors.) Max's name is stamped at the bottom of the card with the Bashful Blue Craft Pad. Then I embossed the letters with Clear Embossing Powder to make them stand out a little more.
I love to stamp the envelopes so they coordinate with the enclosed card. So, I stamped the front of the envelope with Bashful Blue and Certainly Celery stars. As Shelli (the High Priestess of the Kingdom of Crafts) would say, "No Naked Envelopes!"
Just a note, tomorrow I am in a wedding so I doubt that I will have a chance to get to my craft room. I should have something new for you on Sunday!
Thursday, August 23, 2007
Altered Chipboard Birthdays
This month I had two very special birthdays to celebrate - the first birthday for one friend's son and the third birthday for another friend's daughter! As I said earlier this week, I was on a bit of a patterned paper kick and I wanted to use some chipboard...so this is what I came up with:


For both of the cards I used the On Board Simon Lower chipboard numbers and the Eat Cake stamp set. The 3 card features the Petals & Paisleys patterned paper and the combination of Regal Rose, Tempting Tuquoise, Old Olive, and So Saffron Stampin' Write Markers. I used my Regal Rose Craft Pad to ink up the chipboard number. Once it dried, I attached it to the front of the card with MonoMulti liquid glue. The cake tag was punched with the Tag Corner Punch and some Regal Rose grosgrain ribbon was attached to the back of the tag.
For the 1 card, I used up some retired products. The patterned paper is Treehouse (I think) from last years catalog. These are the colors of his nursery, so I had to use it! Anyway, the card base is Buckaroo Blue and the patterned paper is matted on True Thyme. I used the Ticket Corner punch for the matted birthday cake and then attached Cranberry Crisp, True Thyme, and French Blue ribbons to the back of the cardstock. I attached the polka dotted patterned paper to the piece of chipboard with the 2-way glue pen. Once the glue was dry, I sanded the edges with a sanding block. The card needed something a little extra, so I added some HodgePodge Hardware and "eat cake" in the bottom right corner.
I doubt the little ones will appreciate the time and effort that went into each of these cards, but their mommas certainly will!
Wednesday, August 22, 2007
What a cutie!
 Just to give you a heads up - I was on a patterned paper kick this weekend. I think each of the cards that I'll post this week all have new designer patterned paper incorporated into the layout! I went a little patterned paper crazy on my first catalog order, so now I have to put it all to good use!
I love the new Cutie Pie designer papers - the colors are great (Rose Red, Certainly Celery, Bashful Blue, and So Saffron) and I think the different designs make the paper very versatile. There are flowers (which coordinate with at least two different stamp sets), polka dots, and stripes!
You can never have too many birthday cards on hand and I've kind of neglected this set, so I pulled out Eat Cake for this project. I colored the cake and candles with Rose Red, Bashful Blue, Certainly Celery, and So Saffron Stampin' Write Markers. The sentiment was stamped on to a piece of scrap Whisper White cardstock and then punched out with the Key Tag Punch (or as I like to call it, the Dog Tag Punch). Then I cut off one end of the punched cardstock so I could line it up with the edge of the patterned paper.
I'm not sure that this card will actually fit in an envelope - I used a ton of dimensionals! There are dimensionals between the matted cake and the Certainly Celery layer, between the Certainly Celery layer and the patterned paper, and between the matted patterned paper and the Bashful Blue! How's that for some dimension?
Tuesday, August 21, 2007
Defining Silhouettes
 When I started this card, I had something totally different in mind...I was set on using the Linen Prints Double Sided Designer Paper. Initially, I had planned on using the the reverse side. But when I flipped it over to smear some adhesive on the back, I really liked the linen-like brocade pattern. So I scrapped my original idea and went with this! I'm so glad that I did, because I LOVE the way it turned out!
Eventhough I didn't use the more colorful pattern on the reverse side, I did use the same color combination - Old Olive, Close to Cocoa, and Apricot Appeal. The flower image is from the Garden Silhouettes hostess stamp set. I inked the flower with Stampin' Write Markers and then stamped it on to a piece of Whisper White cardstock. I used the Cutter Kit to distress the edges of the cardstock and then mounted it on to a slightly larger piece of Close to Cocoa.
I splurged a bit last month and ordered the Define Your Life stamp set, so I just had to incorporate it into this card. I thought that the word journey really fit with the asian-like feel of this card. I distressed the edges of the small piece of Whisper White cardstock to mimic that of the flower image. Pop both up with dimensionals, add some Taupe/Close to Cocoa grosgrain ribbon, and set 3 Old Olive eyelets and its done! Its just fabulous!!! (If I do say so myself!)
Monday, August 20, 2007
Its the little things...
 A very dear friend of mine is due to have her first baby the beginning of September. She is an insulin-dependent diabetic and was diagnosed with high blood pressure back in June, so she has been "sentenced" to bed rest for the past 5 or 6 weeks. Needless to say, she gets a little stir crazy sometimes! Here is a card that I'm sending her to let her know that I'm thinking about her.
This card is a modified version of one that I have done before (check out my post of Cuttlebugged cards). I swapped out the flowers for a hand print and I switched up the colors a bit...
I used my Cuttlebug to emboss a piece of Basic Gray cardstock and then layered that on to a piece of Bordering Blue. I inked the handprint from the I'm Here stamp set with the Bordering Blue Classic Stampin' Pad, stamped off once and then stamped onto a piece of Whisper White cardstock. I stamped the greeting from the retired Sell-A-Bration set, Happy Harmony, with the Basic Gray Classic Stampin' Pad. I used the oval Coluzzle template to cut out the handprint. Add some sheer white organdy ribbon and Basic Gray taffeta ribbon and the project is complete!

Its a WRECK! There are stamps, ink pads, and wheels everywhere! Its a good thing that I got some blog pics done, because this mess is a total creative block.
It took me a couple of days to make this mess and it will take me at least a couple of hours to recover from it!