
 Hi all! Here is a card I made for my father-in-law. He was thrown off a horse a week or two ago and ended up in the hospital with 6 fractured ribs, a punctured lung, and a separated shoulder! I thought he would get a kick out of this pig and the sentiment. I used an AquaPainter and ink pads to watercolor the image. You may not be able to see it, but I hand-stitched the Cranberry Crisp cardstock with linen thread. Of course I had to distress the edges and add ribbon - no card is complete without ribbon! :)
Thursday, March 29, 2007
Card for my Father-in-Law!
Tuesday, March 27, 2007
My First Tutorial - Masking
OK - Here goes nothing!! I worked this weekend on coming up with the first online tutorial for my blog...now lets see if I can actually post it!
The masking technique allows you to add dimension to an otherwise flat project. You would use this technique to make it seem like one image (in this case, the middle pear) is in front of something else (the other two pears).
For this technique, you will need the following supplies:
Stamp set
Ink Pads
Post-it Notes
Paper Snips
Cardstock
STEP 1

The first step to this technique is to stamp the image you want in
the foreground. This is the image that you want to be "in front".
In this example, I stamped the pear image on to the Very Vanilla cardstock using the Black Stazon ink pad.
STEP 2

Next, stamp the same image on to a post-it note - try to get some part of the image over the sticky part at the top of the post-it note. (This will help the image stay put). Carefully cut out the image with paper snips. If you do not have any post-it notes on hand, use a piece of scrap paper and apply some removable Dotto on the back side.
STEP 3

Place the cut out image directly on top of the previously
stamped image.
STEP 4

Now, stamp the images you want to appear in the background. Stamp them so that part of the image overlaps the masked one. Don't worry - the mask protects the first image! In this example I wanted the center pear to seem like it was sitting in front of the ones on the right and left. So I stamped the other pears and slightly overlapped the edges. Once you are satisfied with your background, remove the mask.
STEP 5

Watercolor, chalk, or embellish the images as you wish. For an added effect, use shading to accentuate the layers.
FINISHED PRODUCT: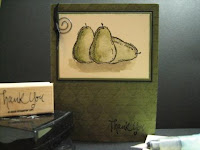
Tuesday, March 20, 2007
Update!
I'm still trying to figure out this whole blogging thing, but I am definitely making progress. Mr. Brown (aka the UPS man) is supposed to be bringing me new stuff to play with tomorrow. I'm going to spend the weekend in my craft room coming up with Spring Mini samples and...drum roll please...my first online tutorial. I still need to get some sort of photo editting software to make this whole process a little easier...but we're getting there! Check back next week for my first tutorial (and in the mean time, keep your fingers crossed that I can get the hang of this!)
Friday, March 16, 2007

This is a project from the March Stamp Camp. This card features the Spring Fever Bundle promotion that is currently offered through Stampin' Up! Check my Stampin' Up! website for more details! (Supplies: Polka Dots & Paisleys, Petals wheel, Petals & Paisleys designer paper, Tempting Turquoise, Old Olive, So Saffron and Whisper White inks and cardstock) All images (c) Stampin' Up!
Welcome!
Welcome to Simple Sentiments! I've started this blog to keep all of my fellow stampers up to date on the latest tips, trends, and techniques in the world of stamping. As I update, this blog will become an online resource tool for how-to's and project ideas. Bear with me - I'm just getting started! Please check back periodically for new posts and pics.
Subscribe to:
Posts (Atom)