
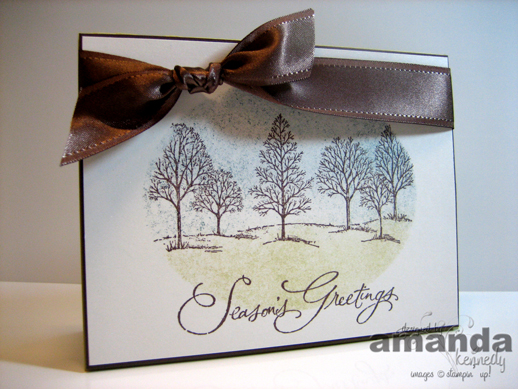
 The pressure is on...with only a handful of my Christmas cards actually complete, I need to finish atleast 10 a day to get them out by the middle of the month! I buckled down today and finished 10 of this design. Whew! 10 down, 110 more to go!
Last month, I ordered some of the Shimmery White cardstock and Shimmer White envelopes and let me just say they are super-shimmery in person. Unfortunately, the camera doesn't do the shimmer justice! I used my Coluzzle to cut an oval out of copy paper and used it to reverse mask the image on to the Shimmery White cardstock. I stamped the tree-scape from Lovely As A Tree in Chocolate Chip and then sponged River Rock and Blue Bayou for the background. The sentiment is stamped in Chocolate Chip and I used some of the GORGEOUS Chocolate Chip Satin Ribbon (which is on sale right now!!) to dress it up a bit. This one got a thumbs up from the hubby - he really liked the color combo!
Saturday, December 1, 2007
A Chocolate Chip Christmas

Tuesday, November 27, 2007
Long time...no post!
During my little "vacation" I took a break from everything...including blogging! I spent time with family, I spent time in my craft room, I spent time Christmas shopping...it was great. Unfortunately, it was back to the real world yesterday, so I figured I should get back to blogging as well. I mentioned before that this year, instead of mass creating one card, I'm going to do a variety of different cards. While I was off work, I got a great start on different parts of my Christmas cards, but I didn't have a single card completely finished...until tonight. This is my first card that is completely finished.
The color combination that I used for this one is a little unconventional when it comes to Christmas cards, but I love Soft Sky, Regal Rose, and Wild Wasabi together! You may not be able to see it all that well, but there is irridescent ice embossed on the ornament. I think I might have gotten a little carried away with the different layers...I hope I don't have to pay extra postage!
Tuesday, November 20, 2007
What a FABULOUS day?!?
 Let me just start off by saying that today was a FABULOUS day! I had a spa appointment this morning...so I have been scrubbed, exfoliated, moisturized, masked, waxed, polished and pampered. And to make it even better, I had a gift certificate so it didn't put a dent in my wallet!!! When I get out of the spa, my hubby called to say he was heading down to the hunting camp and he'd be back tomorrow night. You know what that means...I don't have to cook dinner! See what I mean about a fabulous day?!? Don't get me wrong, I love my hubby dearly and I'll miss him while he's gone...but he needs some time to enjoy his hobbies too!
Once I got home from the spa, I shut myself in my craft room to finally start my Christmas cards. This year, there were so many Christmas stamp sets that I wanted to use - I couldn't narrow it down to just one design! So I decided that since I have about 110 cards to send out, that I'll create 10 each of 11 different designs. That way I get to use all of my favorite images AND I don't get bored coloring/embossing/punching the same things over and over! (I may totally regret this later, but so far its pretty fun!)
Here are a couple of images from Big On Christmas that I'll be using on different layouts. I borrowed this set from my generous downline and friend, Trish. And since its on loan, I better get to stampin'!
Sunday, November 4, 2007
JOY
 When I received my swap cards in the mail from Corie, there was one color combo that really caught my eye. It was a Christmas card that featured Soft Sky, Pretty In Pink, and Basic Black. I loved the way the soft colors looked together on a Christmas card, so I decided to use it for my All About Alphas stamp camp. Only I substituted Wild Wasabi for the Basic Black - it was hard enough stamping green snowflakes, I don't think I could have brought myself to stamping black ones!!!
"J" and "Y" is from the Big Deal alphabet set and is stamped in Soft Sky. The "O" is actually a snowflake image from the Snow Burst stamp set. Its stamped with a Pretty In Pink Craft Pad and is embossed with Irridescent Ice embossing powder. I punched out the snowflake image with the 1 3/8" Circle punch, layered it on a piece of scalloped Soft Sky, and popped it up with a dimensional. The double-stitched grosgrain was a last minute add - there was just too much empty space on the ends.
Other words that would work for this card - Snow, Noel, Love, Home...can you think of any others?
Tuesday, October 16, 2007
Happy Mail!
 Guess what Mr. Postman brought me today??? Bills - nope. Junk mail - wrong again! He brought my swap cards! A couple of weeks ago I posted the swap card that I was sending to my demo-friend Glenda. And this is what I got in return! Pretty fabulous, huh?!?
The back left is a tent-topper card with the jumbo Snow wheel shadow stamped on the front. (You know where you wheel the image in white ink first and then you wheel over it with a darker color? Yeah - I can never get mine to match up but this card turned out BEAUTIFUL!) The back middle is a card that pairs reverse masking with the Stem Silhouettes stamp set. The color combo is awesome!! The back right is like a stained glass window in real life. The tag from Holy Triptych is stamped and then the inside is cut out. The Mary and Joseph image is stamped on another piece of cardstock and then layered under the cut out window. (That probably makes no sense, but I'm trying to do this card justice!)
The middle left uses a trio Season of Joy Christmas trees. They are masked to give the main image a bit of dimension. The colors on this one are fabulous! The middle card on the middle row uses some of the delicious wrapping paper as the background! How cute is that?!? And with the amount of wrapping paper that comes on a roll, it would last forever!! The middle left card also uses the Season of Joy Christmas tree, but this one pairs it with the Dashing designer series paper for a totally different look. Real Red brads were also added for a little bit of WOW on the front of the card!
The front left card uses one of my all-time favorite holiday themes - SNOWFLAKES!!! And the way that the creator used a snowflake for the "O" in JOY...just precious! The front right card has some awesome circle tags from the Naughty or Nice stamp set. Each one is double-matted and "hung" with a bow!
I love each and every one of these cards! These gals are SUPER-talented and I love to participate in their swaps!!
Monday, October 8, 2007
Paisley & Perfect Presentation
 Here is another card from the October Stamp Camps. This one features the Paisley background stamp, which happens to be one of my favorites. You can pair it with really dainty florals for a soft, feminine card or project...or you can use it with more rustic colors for a masculine look! Here, we are going to be using for a Christmas card.
The Paisley background is stamped on to the Ballet Blue card front with Ballet Blue Classic ink. The Christmas tree is stamped in Wild Wasabi on Whisper White and then matted on Wild Wasabi. The Real Red strip of cardstock is layered over the card front and secured with Real Red brads. Finallly, JOY is stamped on to the strip of Real Red with the White Craft Pad.
Do you notice something a bit different about this card??? NO RIBBON! Can you believe it?!? I actually finished a card without a single stitch of ribbon, hemp, or fiber! Don't worry, it wasn't for a lack of trying - I was out of the Wild Wasabi double stitched ribbon!
Wednesday, August 29, 2007
September's Peaceful Wishes
 Its never to early to start your Christmas cards and for this reason, each month I will offer atleast one Christmas card at my next 4 stamp camps! This one is a project from my upcoming September Stamp Camps. (The $10 pre-paid fee includes an order for a White Gel Pen to be used on each of the projects.)
I CASE'd this card from one that I found on SCS. The original design featured the 2006 In Color, True Thyme. To update the project and make it a little more "Christmas-y" I switched up the colors and used Always Artichoke, Bravo Burgundy, Sahara Sand and Whisper White.
The main holly branch image was stamped in Always Artichoke Classic Ink on to the piece of Sahara Sand cardstock. I sponged White Craft Ink around the edges and then highlighted the berries with the White Gel Pen.
This card is super-easy and would really lend itself to mass production. And for an extra touch, stamp the holly image on to the front of the envelope to tie it all together!