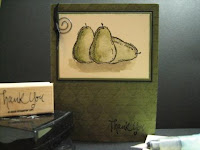
OK - Here goes nothing!! I worked this weekend on coming up with the first online tutorial for my blog...now lets see if I can actually post it!
The masking technique allows you to add dimension to an otherwise flat project. You would use this technique to make it seem like one image (in this case, the middle pear) is in front of something else (the other two pears).
For this technique, you will need the following supplies:
Stamp set
Ink Pads
Post-it Notes
Paper Snips
Cardstock
STEP 1
The first step to this technique is to stamp the image you want in
the foreground. This is the image that you want to be "in front".
In this example, I stamped the pear image on to the Very Vanilla cardstock using the Black Stazon ink pad.
Next, stamp the same image on to a post-it note - try to get some part of the image over the sticky part at the top of the post-it note. (This will help the image stay put). Carefully cut out the image with paper snips. If you do not have any post-it notes on hand, use a piece of scrap paper and apply some removable Dotto on the back side.
Place the cut out image directly on top of the previously
stamped image.
Now, stamp the images you want to appear in the background. Stamp them so that part of the image overlaps the masked one. Don't worry - the mask protects the first image! In this example I wanted the center pear to seem like it was sitting in front of the ones on the right and left. So I stamped the other pears and slightly overlapped the edges. Once you are satisfied with your background, remove the mask.
Watercolor, chalk, or embellish the images as you wish. For an added effect, use shading to accentuate the layers.
FINISHED PRODUCT:


1 comment:
Great card! thanks for sharing the tutorial!
Post a Comment